In this part, we will initialise and develop our web backend from scratch in four subparts:
Choosing the framework
Initializing a Spring project
Programming the backend
Building the backend
Choosing the framework
There are hundreds of ways of building a web backend in various languages. There is no right or wrong, and we could use the same framework that we use for the backend for the frontend. For this series, I wanted to choose two separate frameworks that are easy to set up, modern and can be used for any project, even if this project might suddenly and rapidly grow. So we will use Java with Spring for the backend. I used Spring before and found it pretty straight forward.
Initializing a Spring project
Before we get started, let's get an understanding of what Spring actually is.
What is Spring?
Generally, Spring is a framework that enables you to decouple your program . It makes switching components or implementations easier by using dependency-injection. We will get more into that later. However, this is not the main reason why I prefer Spring for the backend. Spring offers a platform of various components ready to use that are helpful for web apps. For instance, spring security makes access-control pretty easy and robust, and spring data is useful when connecting databases.
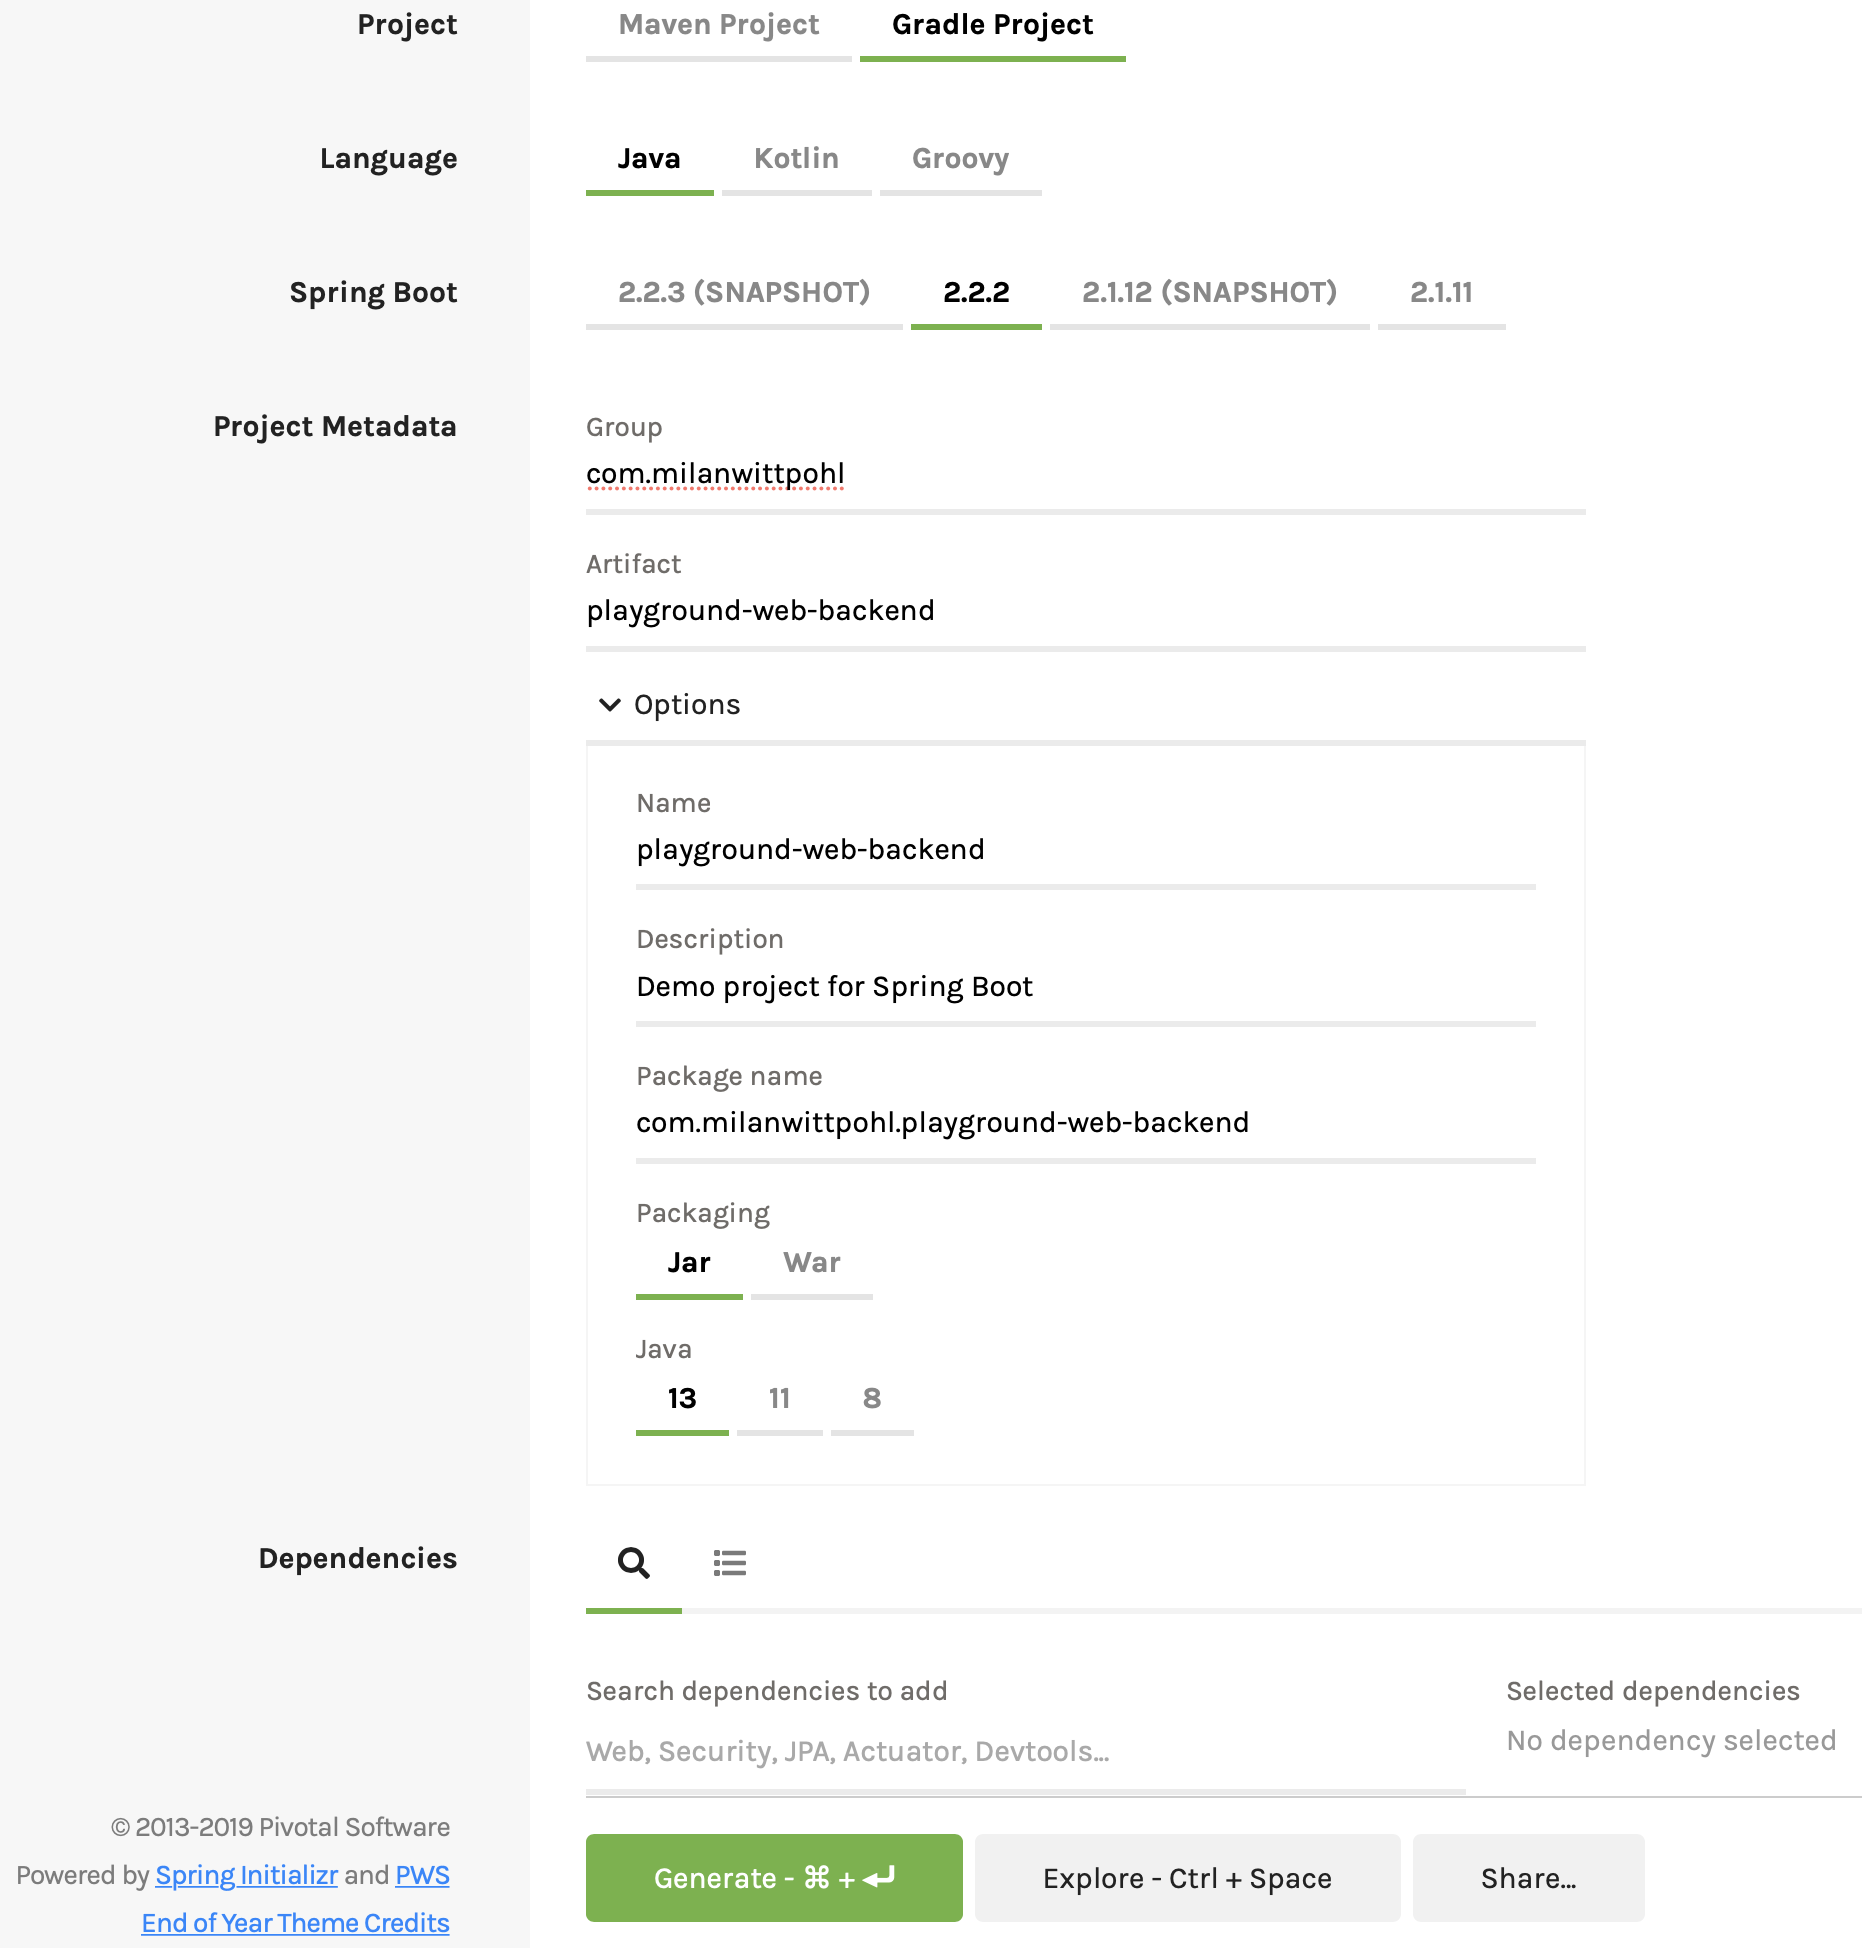
To initialise a new spring project we can use the Spring Initializr. When we open the assistant we will have to choose:
The project
The language
The Spring boot version
Project metadata
Dependencies
Let's break them down.
The project
We have to choose between a Maven and a Gradle Project. Gradle and Maven are both tools to automate the build of your application. We tell it what dependencies we need for our project, such as Spring and it then bundles everything together (builds it). I don't know enough about either of them to give a recommendation and there is probably no right or wrong. As with Spring, we will go with Gradle, because I used it before and liked it.
The language
This is pretty self-explanatory. Let's select java.
Spring Boot
In this step, we select the Spring Boot version. We will use 2.2.4 as it is the current version. But what is spring boot and why do we need it?
Basically, we use spring to program our application and spring boot to take care of the overhead to run the application. Spring Boot looks at your application, makes checks, assumptions and provides standard configurations to make your app run . For instance, it has a server-functionalities embedded, so you don't have to worry about it. Gradle then takes all of that and builds a java application out of it, which brings us to project metadata.
Project Metadata
The first two fields describe who the software belongs to and what its name is. It is common to use the schema com.[name of organisation].[name of software]. In my case, it is com.milanwittpohl.playground-web-backend. More interesting, though are the options for packaging and java version. For the version, I would always go with the latest stable release, 13 at this time. Now let's look at packaging.
Packaging
When building a java application, we can either build a .jar or .war file. Generally speaking, a .war file is a web application archive which runs inside an application server. A .jar file is a java archive file which can also run inside an application server but can also run on a user machine. We will select .jar.
Dependencies
This allows us to define further dependencies, such as spring security or spring data. We will leave it blank for now and add the necessary dependencies later manually when we will actually need them.
Let's generate the project.
Programming the backend
Now that we have initialised or project, lets actually program the backend. We will do that in five steps.
Organising the project folder structure
Understand what was generated
Add a single endpoint to get feel for it
Add a database connection to store data
Add simple authentication to make sure that our endpoints are private
Organising the project folder structure
Throughout this entire series we will use the following folder structure:
Project folder
backend
frontend
Move the folder generated by the Spring intializr to the project folder and rename it to backend.
Understand what was generated
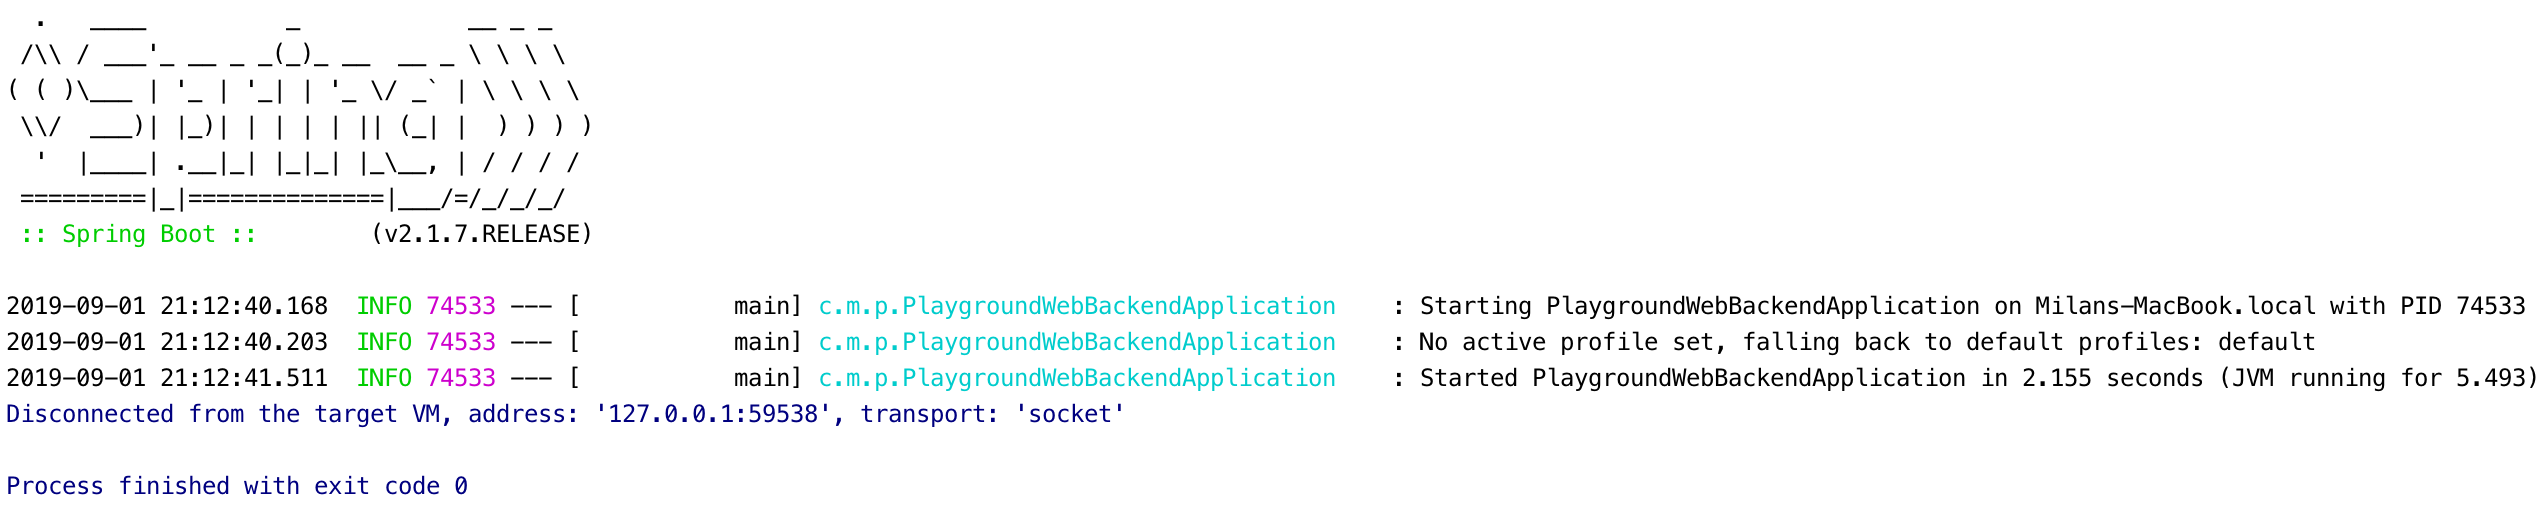
Let's open the project in our favourite Java IDE. For me that IntelliJ. If you don't have gradle already installed, make sure to do so. Also make sure you have the correct java version installed. If we run the project it will start and terminate again instantly as there is nothing to do.
Before we add anything lets just have a look at what exactly was generated and what it does.
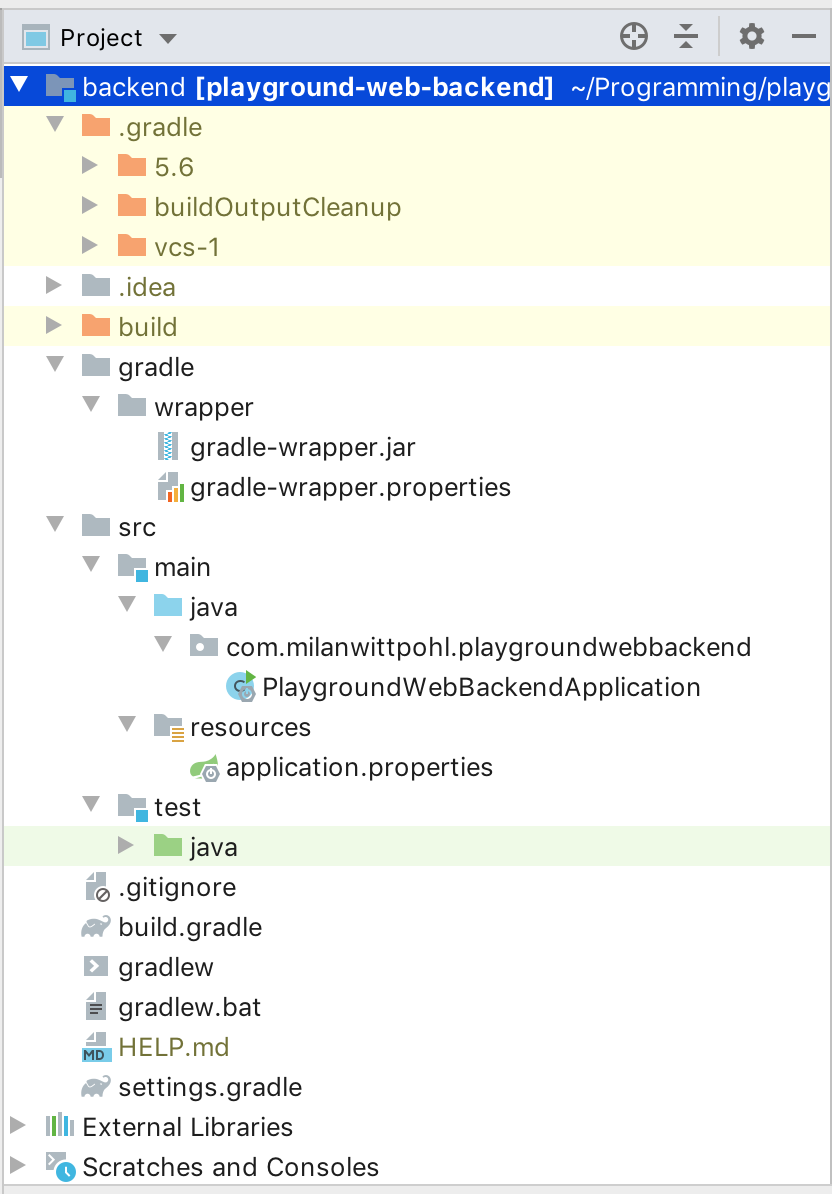
Lets go through every folder and file in the root directory.
.gradle
This folder works as the cache for gradle. As an example, whenever gradle resolves dependencies it uses this folder to cache them.
.idea
This folder is used by IntelliJ to store project settings and is not relevant at the moment.
build
This folder is created when we run the project and contains the compiled java classes that are loaded into the JVM in order to run the project.
gradle
To actually use gradle we use the gradle-wrapper which will provide us with the gradle-build we need. You can read more about it here.
src
This where our source code goes. We will look at the generated Java file "PlaygroundWebBackendApplication.java" in a second.
.gitignore
This file list all directories and files that should be excluded from git.
build.gradle
Here we can find four sections.
Plugins
Plugins in gradle extend the capabilities of our project. As stated here plugins can
Extend gradle
Configure the project
Apply specific configurations
We have three plugins. Let's see what they do:
Spring Boot
Without this plugin gradle couldn't build our project
Spring dependency management
This plugin allows us to define dependencies in the dependency section without providing version numbers
The plugin will then match the version of our spring boot version with the dependencies
Java
This plugin is used to, you guessed it, build java projects with gradle
Metadata
While group and version should be self-explanatory the source compatibility defines which java version your source code is compatible with.
Repositories
Here we tell gradle where to look for those dependencies we define under dependencies.
Dependencies
Now to the juicy part. Here we tell gradle what dependencies we need and tell it to get them for us. Each dependency contains two elements. The configuration and the dependency itself. While the dependency name is pretty clear lets have a look at the configuration. A configuration tells gradle what the dependency should be used for. The configurations we use are actually provided by the java plugin . In most cases we will use implementation as the dependency is used only for the implementation of our program.
gradlew
This shell script is used to start the gradle-wrapper on macos or other unix-based systems.
gradlew.bat
This script is used to start the gradle-wrapper on windows.
HELP.md
Generated help text file by the spring Initalizr.
settings.gradle
Here we can set settings for gradle.
Before we (finally) start programming let's have a look at our one Java-Source-File: PlaygroundWebBackendApplication.java
It contains 14 lines.
While most of it seems pretty self-explanatory there is the one weird annotation @SpringBootApplication. Annotations likes this are used a lot in Spring and we will cover more later. Generally, in Java annotations can be used as markers that are interpreted. Spring looks through your files and applies the appropriate logic. More information on this can be found here. But lets understand what @SpringBootApplication does.
Firstly, using this annotation is the same as using these three annotations
@EnableAutoConfiguration
@ComponentScan
@Configuration
@EnableAutoConfiguration → looks at your application, makes checks, assumptions and provides standard configurations to make your app run
@ComponentScan → where to look for classes with spring annotations
@Configuration → This tells Spring that this class is used for configuration
Okay, this was a lot, as stated before, we will first create a simple endpoint to get the feel for it. After that we will connect a database and the finally secure our app.
Add a single endpoint
First, we have to tell Spring that we want to develop web functionalities. To do that we just change our dependencies in our build.gradle file.
By adding the suffix -web we get additional libraries. After reimporting the dependencies we can start coding.
Endpoints are referred as controllers in Spring
Spring uses a MVC model, the Spring Web MVC Framework . The model is the data that our application serves up. The view could be a web page that we render using spring. The controller gets the data, by referencing the model, and provides the view with the necessary information. Since we don't use Spring to render a view, we simply don't have a view. All that we are left with is a model and a controller. Therefore our endpoint is the controller, as it provides a response to a web-request. To define a new controller we create
a new package called controller
a new java class called HelloWorldController
To define an endpoint we have to do three things.
1. Declare our new class as controller
First, we need to tell Spring that our new HelloWorldController is a controller. To do that we use a stereotype annotation. There are two annotation to define a controller. @Controller and @RestController. @Restcontroller is a specialisation of the @Controller annotation and simplifies the implementation a little for our setup, as we don't need to explicitly dd the @ResponseBody annotation to our endpoints.. It is explained in more detail here. So we just add the annotation to our class.
2. Create the endpoint
To create the endpoint we simply define a method. This method could call a different class and return any kind of object. To keep it simple we just return a String.
3. Define the path and request type of the endpoint
Lastly, we need to tell Spring what path and request type should be mapped to this endpoint. To keep it simple we just define it as a get request under "/sayhello". We do that, you guessed it, using an annotation.
Your class should look like this now
Lets hit run! After the application started we can just open our browser and type in localhost:8080/sayhello and we get our string returned.
Working with data
Every web-backend needs to store data at one point. In order to build a Todo app, we will define a simple todo-Object and then implement endpoints to read, write, update and delete entries. Before we start coding we need to tell Spring that we want to work with data.
For the sake of simplicity we will work with MongoDB, but the setup is similar for other databases. To add the functionality we simply add another dependency called org.springframework.boot:spring-boot-starter-data-mongodb in the build.gradle file.
You also need to have a running mongoDB instance on your machine. Probably the simplest way to do that is to use a simple docker-compose file. If you dont know what docker is, don't worry. We will cover all this in part III. For now install docker and create a new file in your project root directory (not in the spring project) called docker-compose-dev.yml. Insert the following code and replace the placeholders.
To start the database run the following command in the terminal from your project root folder. Leave the terminal window open.
Okay, back to spring. We should also think about the way we structure our application.
We will create a data object that describes our ToDo-Object
We will create a repository that talks to the database
We will create a service that handles additional business logic
We will create a controller to accept request to read, create, update and delete entries
Creating the data object
We start by creating a package called data. Next we create a java class called ToDo. This class characterises a single todo. To keep it simple our todo-Object has just a unique id, a title and a status. This gives us the following class.
While the properties title and completed will be set by the user, the id should only be touched by the framework to ensure its integrity. Since most objects have an id spring offers a convenient annotation for that called @Id. The annotation marks the field as primary key and also auto generates a value for us. For everything to work properly we also need to set up a constructor and getter methods for all of our properties.
Creating a repository
The repository interacts with our data base. This is where Spring really starts to shine. To interact with a mongo-database we simply create an interface that extends the MonogRepository. Let's call it ToDoRepository and put it into a new package called repository . When extending the MonogRepository we have to provide two parameters, as it uses generics. The first is the entity that we want to use, our ToDo class. The second parameter tells spring the type of the id attribute , in our case that is a string. That's it, wasn't that easy?
Creating the service
Create a new package called service. In that package we create a new java class called ToDoService. This is where our business logic is happening. Here and only here should we work with the data. Luckily, we don't have any business logic. However we need to define a few methods to read, create, update and delete entities. But it is super easy, trust me.
First, we tell Spring, that this class is a service by adding the @Service annotation to it. This adds further functionalities by spring .
Next we want to add our repository as a private property so that we can use it. This is where Springs constructor-injection comes into play. We simply add the annotation @Autowired and spring makes sure we have an instance on runtime.
Now we add methods to
get all todos
get a single todo by id
save a new or existing todo
delete a single todo by id
As we extended the MongoRepository our repository already has all the methods we need.
Everything should be pretty straight-forward except maybe the findById method. If we try to look up an entity by its id it can happen, that this there isn't an entity matching the given id. That is why our repository returns an Optional of a ToDo. An optional can either contain the entity or not. To make things simple we tell our program to throw a new exception if there is no match. This exception has to be created first in a new package called Exception.
Creating the controller
We create a new controller in our controller package and call it ToDoController. This is also pretty straight forward, so I'll just present the final code and then explain a few new and different things compared to our HelloWorldController. You might ask yourself, why we not just return the entities here and instead use the service. While this might seem reasonable right now, it becomes quiete chaotic once we have multiple data objects and controllers.
First, we notice that the class has a second annotation called @RequestMapping. This way all endpoints are mapped at /api/todo.
To get a specific todo we want to pass the id via the url (e.g. localhost:8080/api/todo/5d6e53da5c88f13387cb8fa3). That's why we need to tell Spring that the url contains a variable, the id. This is done by using the curly brackets on the get mapping annotation and the @PathVariable annotation in the method header
To create or update an entity we need to transmit a json-body containing the information. We let Spring know by using @RequestBody.
Run the application and you will see that you can get, create, update and delete todos.
Securing the Endpoints
Before we build our application and complete this tutorial we need to make sure that our endpoint is secure. We could implement a user management service, but for now we will just secure our endpoints and add one user for authentication.
We start by adding a new dependency to our gradle file called org.springframework.boot:spring-boot-starter-security. Next we need to configure spring on how to secure our application. Configuration in spring can be done using classes and annotation. Let's create a new package called configuration and a new class within that package called WebSecurityConfiguration .
To let spring know that this class is used for configuration we add the @Configuration annotation to the class
As we want to use this configuration to define the access management, our class needs to extend the WebSecurityConfigurerAdapter class
To actually secure our endpoints we need to override the configure method of the WebSecurityConfigurerAdapter class
Within the method we configure the HttpSecurity instance http for our application. We chain different commands together using the and-method. As there is a lot that is going on here, we will go through it line by line. Most of it is taken from this tutorial, which also provides a more in depth look.
Overall Protection
First we tell our app to secure (authorise) all request to /api/. Any http request needs to be authenticated via http-basic
An entry point used to send back a 401 Unauthorized response if a user tries to access a protected webpage
While we could send the credentials with every request, we want to have a login page where the user can login and then get a token. This way we can identify each user session more easily and we don't need to send our credentials every time
The parameter "loginProcessingUrl" tells the app the url where we send the credentials to. We will use this in our frontend.
Next we define two handlers, one if the login succeeds and one if the login fails
Finally, we take care of CSRF, something that we need to talk about in more detail.
Cross Site Request Forgery (CSRF)
I will only cover the basics here so you know why we have to make changes to our backend. If you want to go into more detail I would recommend these links: What is CORS?, What is CSFR, Cross Site Request Forgery (CSRF) , Is CORS helping in anyway against Cross-Site Forgery? .
We want to make it as hard as possible for hackers to mask as actual users. We try to ensure that by making sure that every request to the backend must contain an unique token inside the header. This token is set automatically by our frontend (part II) using the cookie-to-header method. In our current set up this will not protect us as soon as our setup fails as the token is transmitted via a cookie. It does however add an extra layer of protection.
In this final line we configure:
that csrf protection should not be applied to our login endpoint, as this is where the user gets the token
that csfr prrotection should be used with a standard cookie-csrf-token-repository
that this repository should set httponly to false so that our frontend can use the cookie-to-header-method
Login Page - Success Handler
Our success handler is a new class in our configuration package, that extends the SimpleUrlAuthenticationSuccessHandler.
Basically, we dont want our backend to return a 200 Okay response if the login was successful. The SimpleUrlAuthenticationSuccessHandler which we extend here, does that but also redirects the user to a certain URL. We don't want that, we just want to return a 200 response. To make our life easy, we simply copy the code of the SimpleUrlAuthenticationSuccessHandler and remove the logic for the redirect. Leaving us with this code:
We will need to inject this class our WebSecurityConfigurerAdapter. That is why we need the @Component annotation to tell spring, that we want to inject this class later.
Login Page - Failure Handler
In case the login fails we simply want to return a 401 Unauthorized response
Here we dont even have to implement our own code, we simply use the SimpleUrlAuthenticationFailureHandler class.
Exception Handling - RestAuthenticationEntryPoint
In case the user tries to access a page unauthorised, we simply want to return a 401 response.
Create a new class called RestAuthenticationEntryPoint.java and insert the following code.
Inject the Handler in the WebSecurityConfiguration
To use the handlers, we need to inject them into our WebSecurityConfiguration.
Defining Users with Credentials
If we now run the application any request to /api/todo/ will fail as we are unauthorised. However, our first endpoint /sayHello is still accessible
Now we need to configure a simple user that is allowed to access /api/todo/. To do so we add two methods in our WebSecurityConfiguration
Via the first method we tell spring to store user details within the application memory and create a new user
To encode the password (because we never want to store passwords in plain text) we define a password encoder in the second method
You may have noticed that we use a new annotation on both methods called @Bean. With that annotation we tell spring to create a java bean . Without the annotation our configuration could not access those methods.
Our configuration class should now look like this
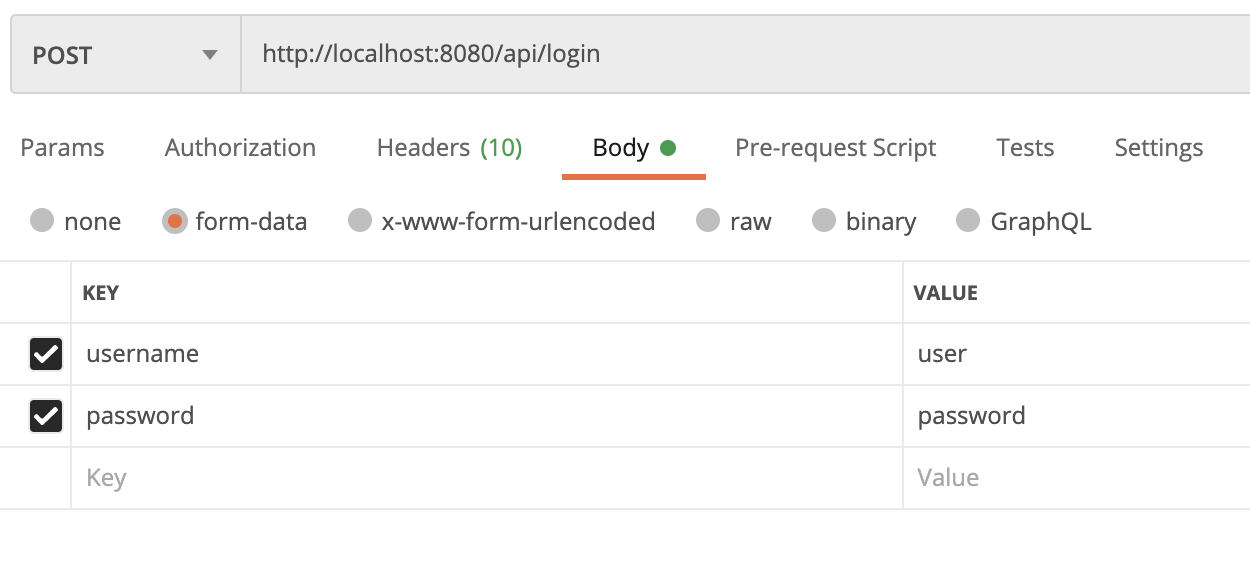
If we now run our application our todo endpoints are secure and can only be accessed by logged in users. An easy way to test this, is to use Postman. However, with increased security comes a bit of a complicated testing process. First we need to login by making a POST request to api/login/ and submitting username and password as form data.
In the response for the login a new cookie is set.
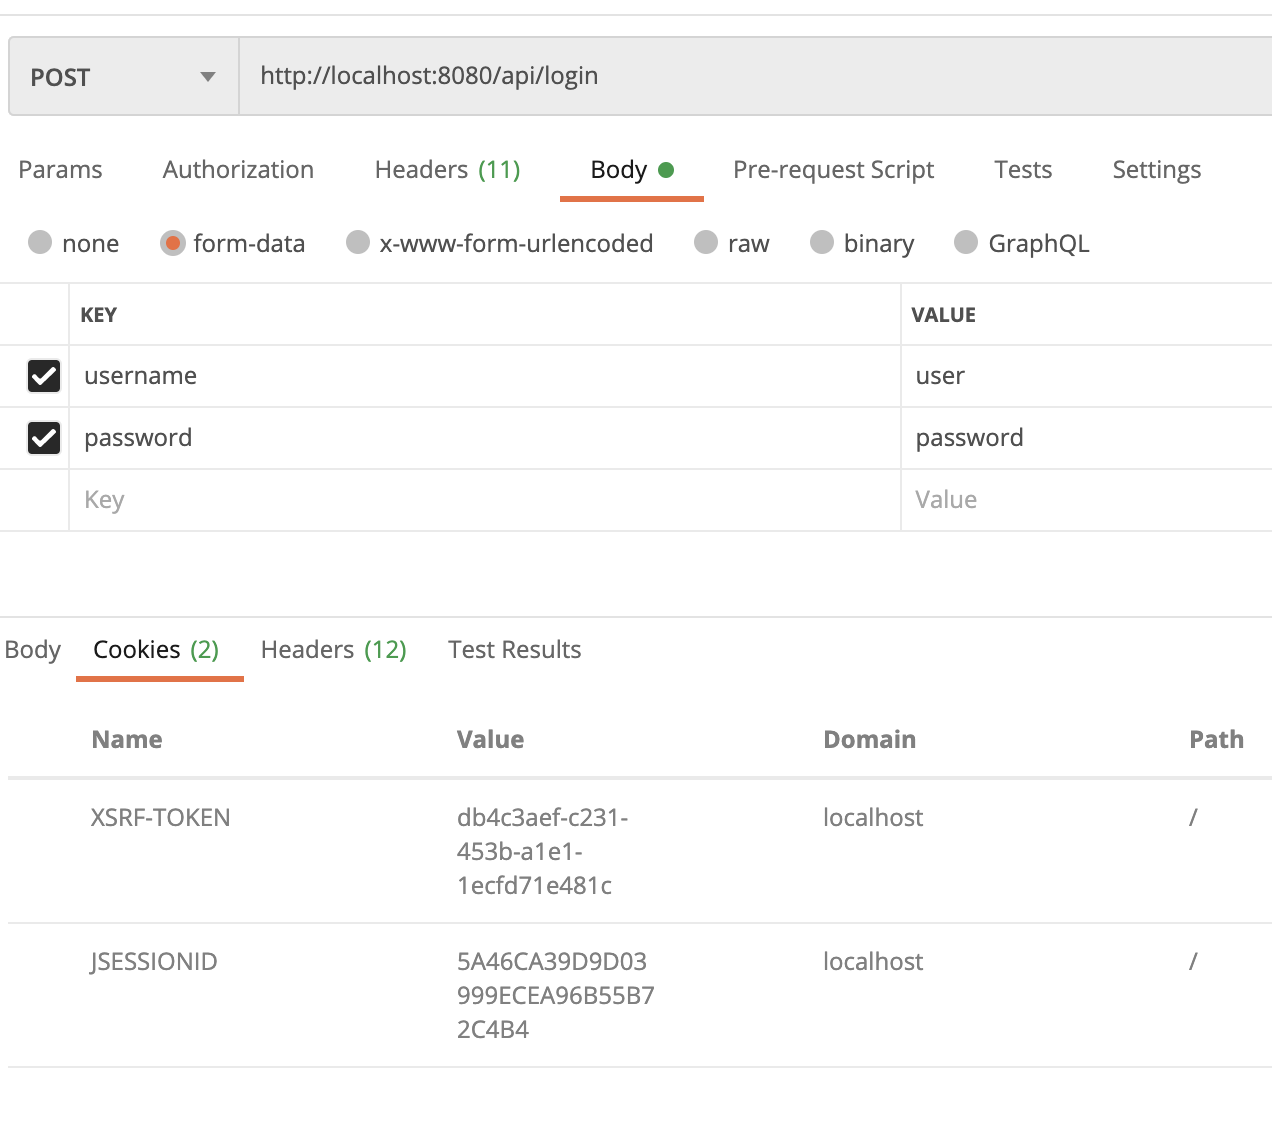
This cookie is used automatically by postman. However, we also need to place it in all requests as header, as shown here.
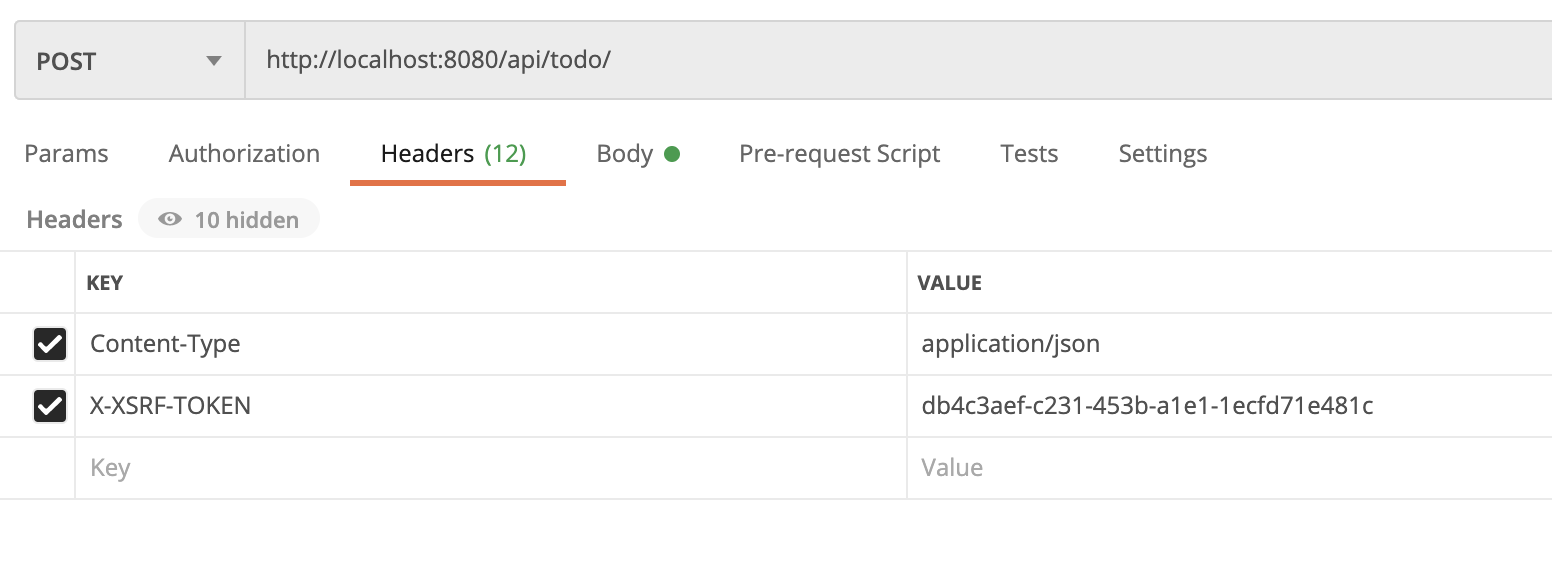
Now, everything should be working smoothly as before.
Building the application
This is actually really easy. As you can recall we decided to use gradle for build automation. So all we need to do is open up a terminal, navigate to our project folder, and execute
This builds us a .jar file under ./build/libs/.
To run our application simply execute
The complete code after completing all parts can be found here.